Do-it-yourself high-quality microphone for your computer. DIY microphone - tips and tricks on how to make a homemade sound recording device
Working with electrical appliances has always been considered difficult. Usually only people who have enough experience or have been trained in this in educational institutions are engaged in it. We are used to buying equipment in specialized stores, so few people think about making various types of devices on their own. Of course, you can repair something yourself, but making equipment at home requires skill.
If you have the necessary equipment and materials, experience in this area and a desire to design something and save the family budget, you can try to find interesting ideas on the Internet. There you will find many interesting ideas and tips on how to make your appliances better.
In this article we will look at one of the studio devices that can be used for personal use as well. It's about microphones and how to create them with your own hands at home. We will consider all the pros and cons of this method.
IMPORTANT: Working with electronics and electrical appliances carries risks and potential health hazards. We recommend that you refrain from work if you are not confident in your skills and abilities in the field of electrical appliances.
Can I make a microphone with my own hands?
Man is able to create almost anything he wants, nature has awarded him with inimitable intelligence and the ability to fantasize. A microphone for a computer is far from the most complex device of the possible inventions of mankind. But it is worth considering the level of your abilities and skills. The final result of all work will depend on them.
 If you are seriously thinking about creating a unique microphone, it is worthwhile to provide the workflow with all the necessary tools and materials in advance. To do this, you need to purchase:
- To create an electret microphone, you will need a special capsule, which can be pulled out of the radio or used on the market. It is he who will be the main element in creating a home microphone.
- Special adapter for connecting to a 3.5 mm jack socket. You can use the wire from your old headphones with the appropriate cable.
- Any cylindrical material is enough for the main body: syringe tubes, cans, tubes ...
- The required amount of wire. Choose the length according to the distance from the sound transmitter. The optimal would be to use a length of 1 - 2 meters.
- Foam or fur covering that protects the case from wind and moisture.
This is enough to create a homemade version of the device. No expensive items, only the bare essentials for proper functioning. This method will help you save money, since good equipment in stores is very expensive, and cheap models usually have poor parameters and characteristics of the resulting sound.
IMPORTANT: The appearance of the microphone will turn out to be unusual and will differ from the store versions. If you wish, you can purchase additional parts for the case or look for old non-working devices and take spare parts from them.
Manufacturing instruction
After you have prepared everything for manufacturing, you can proceed to the most difficult stage of work. Be especially careful when performing the electronics sequence. For convenience, all points are detailed in the instructions below:
- Prepare the microphone housing. Round off the previously prepared cylindrical workpiece and cut it off at the ends, leaving the edges open.
- Thread the wire inside the cylinder and secure it inside by tying one end in a knot.
- Now solder the capsule to the end of the wire that is located inside the cylinder and secure it with a clip or paper clip. The capsule braid must be connected to the shielded wire.
- Solder the other free end of the wire to the 3.5 mm jack plug. In this case, it is necessary to connect both channels of transmission of sound vibrations and their broadcast to the transmitter.
- A foam cover works great for the top, cut to the appropriate sizes and shapes and attach to the top.
- After that, connect the device and test its operation by saying a few phrases into the microphone. When the wires are properly connected, the sound should be transmitted to the capsule and amplified.
IMPORTANT: If there is no result, the problem may be in the soldering points. Try to disassemble everything and re-solder the wires to the capsule and plug.
How long will a homemade microphone last?
 The exact service life for homemade things, as opposed to purchased items, is difficult to determine and say. You will not have a guarantee for this product, so you will also be able to repair and extend its performance yourself. The term of use will also vary depending on a number of factors. Among the main parameters affecting the duration of functioning are the following:
- The quality of the materials used during work.
- The security of the wire and the ability to withstand heavy loads.
- The mode of operation depending on the required parameters of the technique and the supplied voltage.
- Accuracy of use and timely troubleshooting.
Try changing characteristics and using different materials to compare and choose the best option.
You will need
- - shielded audio cable;
- - high impedance earphone;
- - low impedance scientist (you can use a dictaphone or a player);
- - radio broadcast speaker;
- - sound transformer;
- - soldering iron;
- - rosin;
- - tin;
- - insulating tape;
Instructions
The microphone can be made from a high-impedance earpiece, which is used in headphones. To do this, use a shielded cable to connect it to the appropriate connector of the amplifier or mixing console. Such a microphone is quite suitable for broadcasting or recording speech. But for recording or amplifying a piece of music, the quality will be insufficient. If you want a high-quality wide-range microphone, make it from a broadcast speaker "radio point".
Take the radio broadcast speaker and open its case. Inside, in addition to the speaker itself, you will also see an output speaker and a transformer, as well as a variable resistance resistor. You don't need the resistor now, so unsolder it from the circuit and remove it from the case. Connect the speaker to the transformer directly.
Unsolder the plug and wire from the high-impedance winding of the transformer and, in their place, connect a shielded wire with the appropriate connector for switching on to the microphone jack of the recording or amplifying device.
This microphone can be slightly improved. For example, you can screen it. Cover the inside of the translator housing with steel sheet or foil paper. You can use, for example, foil from cigarette packs. Make electrical contact between this shield and the braided shield of the audio cable, for example with a screw and a contact strip. This will eliminate interference from external electromagnetic fields.
You can also improve the sound quality of such a microphone. Connect a tunable RC filter in series with the high resistance winding of the transformer. This filter consists of a 510pF capacitor in parallel and a 1mΩ variable resistance. Attach the resistor to the front panel of the radio in the place of the previously removed volume control. Solder the filter and, having connected to the amplifier, select the filter impedance for the best sound quality.
In a circuit with a matching transformer, you can use any low-impedance speaker, as well as an output transformer from any tube receiver. Instead of a speaker, you can use low-impedance headphones, including those from a telephone set or a player. If you take a miniature earphone from the player, then the whole structure can be made portable by placing the earphone itself in a metal tube and styling it like a cord microphone. In this case, place the step-up transformer in the immediate vicinity of the amplifier. Make all connections in this design with shielded wire.
Let's start with the accessories.
1) Capsule
2) Sound card
3) Tripod
4) USB extension cable
5) Dishwashing sponge
6) Stationery elastic bands 2 pcs.
7) And something like a tube
Assembly.
1) Let's start with perhaps the most important sound card and capsule. I bought them from the Chinese. The sound card cost me 60 rubles, and the capsules for 10 pcs. 50 rubles. Let's disassemble the card and use the poke method to solder the capsules there to the microphone output (yellow). The card is needed so that the sound does not go through the cable to the computer, thereby creating an extra background, by soldering the capsules directly to the card, we made a minimal background

2) Take a tube or something like that, I personally took a cap from a hairspray. Cut out the top, as in the picture and cut along the edges small slots of 2 pieces. parallel to each other on each side and put elastic bands on it, as shown in the picture, this is necessary to suppress vibration.

3) Let's make a hole for the tripod screw at the bottom of our tube, but this is for those who will use a three-leg tripod.

4) Insert our blank with a map, as in the picture

5) Cut off the cup and glue it to the card so that it acts as a wind of protection

6) And fix it on a tripod
Conclusion.
Well, in conclusion, we connect our microphone to the PC via a USB extension cable, we should automatically install the drivers for our card. If they are not installed, then look at them on the seller's page where you purchased it. You can evaluate the sound quality on the video
Modern computer technology often has a lot of functionality and is equipped to meet the most stringent user requirements. But this is only in a situation when a PC user has acquired one of the latest models for himself and enjoys all the “blessings of civilization”. But it happens when you just need to use a microphone to transmit information, and it is either broken or simply not there. In principle, this does not matter, because we know how to make a microphone from headphones, and in this article we will also help you deal with an urgent problem quickly and easily. We'll also show you how to make a microphone from scratch.
No soldering
In fact, you can buy such a device in advance if you plan to use such a function when communicating via a PC. The device will be inexpensive. But if this is not your way, then we will now figure out how to make a microphone for a computer out of headphones. Moreover, this is a fairly simple process that does not take a lot of time and labor! So let's get down to business.
Instructions:
- Plug the headphones into the pink jack. This jack serves specifically for a microphone. Of course, plugging headphones into the microphone jack is wrong, but we will try to use our headphones as a microphone.
- Then click "Start" - "Control Panel" - "Hardware and Sound". In the sound section, find “Manage audio devices”, and then click on the “Recording” section.
- Then - in the “Recording” section, you should definitely see a device named “Microphone”.
Important! If this device is missing, it means that you did something wrong, try reading this manual again, completing everything correctly.
- Next, you make this device the “Default Device”. To do this, click once on the device, and then click on the "Default" button.
- Then, in the “Use this device” column, note the “Use this device (incl.)” Column.
- Next, go to the "Levels" section and slide the slider to the very end.
Important! In order to test the performance of a microphone made of headphones, simply put a checkmark in the place where it says “Listen from this device”.
Important! Problems may arise during the connection and configuration process. And so that you do not have to spend a lot of time looking for their solutions, we suggest that you immediately read or save yourself the information from our articles:
Theoretical information on electret microphones
Today electret microphones have almost completely replaced other microphones. This indicates that, with a relatively low price, they have a flat frequency response, low weight and high reliability. If diminutiveness is extremely necessary, then according to this property there are no equal to them.
An electret microphone is a classic condenser, one plate of which is made of a fairly thin layer of polyethylene film placed over the ring. The film is subjected to the process of bombardment with a beam of free electrons, which penetrate a short distance, due to which a space charge is released, which can persist for a sufficiently long time. This type of dielectric is called electret, and for this reason the microphone is called “Electret”. A thin layer of metal is also applied to the film, which is used as one of the electrodes.
DIY electret microphone - secrets of making
To work you will need:
- Capsule from an electret microphone. By and large, it is quite easy to get it from an old Chinese tape recorder or an outdated landline phone.
Important! The larger the capsule diameter, the greater the low frequency range.
- A piece of flexible thin wire.
- Ordinary 3.5 mm jack plug.
- Plastic syringe barrel.
- A small paper clip and a piece of foam.

So, let's get down to the process of assembling a microphone for a PC with our own hands:
- Cut off a small amount of the syringe barrel from the side where the needle itself is attached (approximately near the 1 gram pointer) with a utility knife.
- Remove unnecessary markings from the surface of the syringe body with acetone or other solvent.
- Sand the trimmed edge with light grit with sandpaper.
- Push the shielded flexible wire through the hole and make a small knot.
- Then, solder the capsule so that the sheath of the shielded cable connects to the metal housing.
- Insert the primer into the housing, and then click where the needle was previously placed using the foot of a standard clerical clip.
- On the other side of the flexible shielded wire, solder a 3.5 mm jack plug, with the right and left channels connected together.
By and large, the microphone is already completely ready, but we will make one more aesthetically important detail from foam rubber - a windproof cap:
- Cut a square piece of foam with a knife.
- With absolutely any sharpened pipe, make a neat cylindrical indentation, rotating the tip from the inner surface of the pipe.
Important! For these purposes, sections from used broken telescopic antennas, which you can sharpen with a scalpel, are excellent.
How to make a simple stereo directional microphone out of junk?
I have already described one design of a microphone intended for a digital camera, but its operation revealed a number of shortcomings, which are described below. So I tried to make a better model.
The result is two different microphones, one monaural and the other stereo.
The most interesting videos on Youtube
 |
 |
 |
 |
Prologue.
My first homemade microphone had too uneven frequency response due to resonance in the tube. In addition, it only allowed recording monophonic sound. It was decided to build a more perfect microphone model, but, as always, do without turning and milling work.
In the course of reflection, several ideas came to the manufacture of a slotted microphone tube without the use of machines, and the tube itself.
The tube of the slotted microphone made of washers.

The slit microphone tube can be made from large washers. If you drill two holes in each washer, you can assemble a multi-layer sandwich using two pins, and adjust the size of the slots using small washers.
This idea, in my opinion, has only one significant drawback. In order to drill holes in each washer with sufficient accuracy, a small jig would have to be made.
The tube of the slotted microphone is made of transistor clamps.

If, instead of washers, you use clamps from old-type transistors, then you won't have to drill at all. All that remains is to collect the pipe.

The disadvantage of a pipe assembled from standard clamps from P213 ... P217 transistors is a lot of weight. If we use duralumin clamps from transistors of the KT801 type, then you can get a fairly light tube. True, in such a tube it will be difficult to place two microphone capsules at once, so you will have to look for another solution for a stereo phono microphone.
Slit microphone tube made of metal tape.

The tube of a slotted microphone can be made from a narrow metal strip by twisting it into a helical line on a template of the desired diameter. Then the width of the slots can be adjusted by changing the pitch of the screw.
Based on these ideas, I made two microphones - monaural and stereo.
This time, I omitted some of the details regarding the assembly of microphones and the manufacture of parts, since I have already covered them in detail.
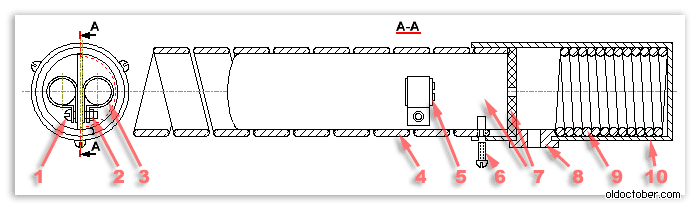
Slit microphone made of clamps from transistors.
This is the drawing from which a slotted microphone was made from transistor clamps.

- Clamp from transistors - duralumin.
- Nut - steel, M2.
- Grover washer - steel, M2.
- Hairpin - steel, M2.
- Gasket - cambric.
- Shielded cable - Ø2mm.
- Bushing - rubber Ø11mm.
- Body - medical syringe - 5g.
- Back wall - medical syringe - 5g.
Assembling a microphone from clamps from transistors turned out to be easier than ever. Here's what was used to build.

- Grover washer - steel, M2.
- Shielded cable with Jack 3.5mm jack.
- Helical spiral - Ø2mm solder.
- Velvet.
- Electret microphone capsule - Ø10x7mm.
- Clamp from transistors such as KT801, KT602, KT604.
- Medical syringe - 5 gr.
- Stud, nut - steel, M2 (studs were made from a bicycle spoke).

In order to make the appearance more presentable, I covered the body of the microphone made from a syringe with heat shrink tubing. First I sat down the front part, and at the end of the assembly I inserted the cover and seated the tail part.

Here's what happened.
Directional slit stereo microphone made of metal tape.
This is a drawing from which a directional stereo microphone was made from metal tape.
- Screw - M1.6x5.
- Nut - M1.6.
- Clamp - steel, S0.3mm. (tin from a tin can).
- Tape - steel, S0.5x8x50mm.
- Screw - M1.6x5.
- Partition - medical syringe 20g.
- Through bushing - rubber Ø11mm.
- Load - solder Ø2mm.
- Krpus - medical syringe 20gr.
This microphone required very few details.

- Shielded mono cable - Ø2mm.
- Shielded stereo cable - Ø3mm.
- Screw - M1.6x5.
- Through bushing - rubber Ø11mm.
- Clamp - steel, S0.3mm. (from a tin can).
- Screw, nut, washer - M1.6.
- Load - solder Ø2mm.
- Electret microphone capsule - Ø6x6mm.
- Medical syringe 20gr.
- Tape - steel, S0.5x8x50mm.
- Shrink tubing - Ø8mm.

In order not to paint, I covered the steel tape with a heat-shrink tube, and then rolled it into a helical spiral position 1 on the body of a 10-gram syringe.
From the body of a 20-gram syringe, I made the microphone body pos. 3, and the partition, pos. 2, from the piston of the same syringe.
At this point, you can drill three holes to attach the tube to the body and cut the threads.
To reduce the length of the unshielded wires to the mic capsules, I extended the stereo cord with two small lengths of mono cord. The picture shows how this was done. Thick paper is used as insulation.

The microphone body, as in the previous design, was covered with a heat-shrinkable tube.

Another picture explaining the assembly order.

Here's what happened.
| Get the Flash Player to see this player. | ||
Here's how it works.
Small details.

When testing the first pair of microphone capsules, it turned out that their frequency response was too different. In anticipation of the market day, I even assembled a small stand for testing microphones without soldering. I bought a few more primers for $ 0.4 to choose from. But, the very first pair, taken from this purchase, turned out to be coordinated according to the frequency response. I did not experiment any more.